
Table of Contents
1. Smart shower design for higher ROI
2. Design levers that raise value and cut costs
3. From concept to install: practical steps
4. shower FAQ
5. Conclusion: ROI-focused takeaways
Smart shower design for higher ROI
Smart shower design boosts guest comfort and profitability. A walk in shower or shower stall with a glass shower door and a rain shower head delivers luxury while conserving water. Durable fixtures lower maintenance costs, and strong first impressions drive better reviews and referrals, lifting occupancy value. In compact bathrooms, thoughtful enclosure and tile choices heighten perceived value and accessibility, supporting higher ROI over the property’s life.
Profit impact of smarter shower design
Improved user satisfaction
Guest satisfaction drives referrals and higher occupancy value.
Lower lifecycle costs
Durable fixtures cut maintenance and repaint cycles, lowering operating costs.
Key components that influence ROI
Fixture quality and smart controls
Quality fixtures with water efficiency and basic smart controls save water and boost comfort.
Glass doors and enclosures
Sturdy, easy-clean doors reduce leaks and upkeep.
Durable tile and substrate
Durable tile and solid substrates minimize repairs.
These considerations translate into tangible ROI through lower maintenance and higher bookings. Design levers that raise value and cut costs guide decisions across shower enclosure in small bathrooms, walk in shower design with tile options, and rainfall head installations.
Design levers that raise value and cut costs
Smart design choices in the shower area can elevate guest appeal while trimming operating costs. By focusing on water efficiency, enclosure quality, and compact layouts, you gain ROI without sacrificing experience. The following levers translate concept into tangible improvements in a typical bathroom renovation.
Rain shower head as a value-add
Water efficiency and flow rate
- Target WaterSense labeling (≤1.8 GPM) for a rain shower head to balance luxury feel with ongoing water savings.
- If low water pressure is a concern, look for pressure-compensating flow regulators and larger-diameter spray outlets to preserve perceived volume without spiking usage.
- When evaluating shower head options, compare flow rate at your home’s typical psi to avoid over- or under-spraying.
Shower stall footprint and ROI
- Assess whether the existing shower stall footprint supports a comfortable, accessible layout. A well-planned stall with a 60×32 inch opening often yields better resale impact than a cramped enclosure.
- ROI sweet spots include upgrading to a reliable rain shower experience while upgrading glass doors and smoothing seals. In practice, mid-range shower upgrades can recapture a meaningful portion of project costs through perceived luxury and reduced maintenance.
Installation considerations for rainfall heads
- Simple swap: shut off water, remove old shower head, wrap threads with plumber’s tape, and thread on the new rainfall head to a standard shower arm.
- For best results in homes with mixed pressure, consider a high-quality shower arm and a regulator to stabilize the feel of the rainfall pattern.
Related priorities
- If guests value a spa-like feel, pair the rain shower with a quality shower head that performs well under varying pressure and heights. This aligns with ideas for shower enclosure in small bathrooms by preserving line of sight and perceived space.
Door and enclosure options for ROI
Glass shower door installation tips for clean lines and easy maintenance
- Choose tempered or laminated glass with clear, low-iron clarity to minimize tint. Use a minimal-frame or frameless system for clean lines.
- Ensure precise measurements, proper track alignment, and robust seals. Use easy-clean coatings and annual maintenance to prevent hard-water buildup.
Choosing framed vs frameless designs based on budget and aesthetics
- Framed doors are budget-friendly and durable with simpler seals; frameless doors deliver a lighter, premium look but at higher hardware and installation costs.
- For small bathrooms, frameless glass can visually expand the space, while framed options may reduce long-term maintenance costs.
Leak prevention and long-term maintenance expectations
- Verify slope of the shower floor (about 1/4 inch per foot) to direct water toward the drain.
- Use epoxy grout or silicone around tiles and doors; routinely inspect seals and replace worn gaskets to prevent creeping leaks.
Quick reference: design choice table
| Design | Benefit | Limitation |
|---|---|---|
| Framed | Lower upfront cost; solid seal | Heavier visual, more grout |
| Frameless | Modern, spacious feel | Higher cost; precise installation required |
Walk-in shower design considerations for small spaces
Ideas for shower enclosure in small bathrooms to maximize space
- Favor clear, frameless glass panels with minimal framing to preserve sightlines.
- Consider sliding or bi-fold doors or a fully open walk-in with a single glass panel to avoid door swing conflicts.
- Use a shallow alcove and a single bench or built-in niche to maintain a open layout without crowding.
Tile options and layout strategies to visually expand the room
- Use large-format porcelain tiles (12×24, 24×48) with pale hues to reduce grout lines and create a seamless feel.
- Light, cool tones and vertical or linear tiling patterns elongate the space; a linear drain enhances continuity and reduces focal clutter.
- Incorporate a subtle tile niche with the same color family to maintain visual flow and prevent visual breaks.
From concept to install: practical steps. These design levers set the stage for practical steps that follow.
From concept to install: practical steps
A thoughtfully planned shower project balances comfort, durability, and style. Whether you’re upgrading a shower stall or designing a walk in shower, the right combination of rain shower performance and a smart enclosure can transform daily routines. The guidance below covers installing a rainfall shower head, selecting a high-performance option for low water pressure, and ideas for compact shower enclosures.
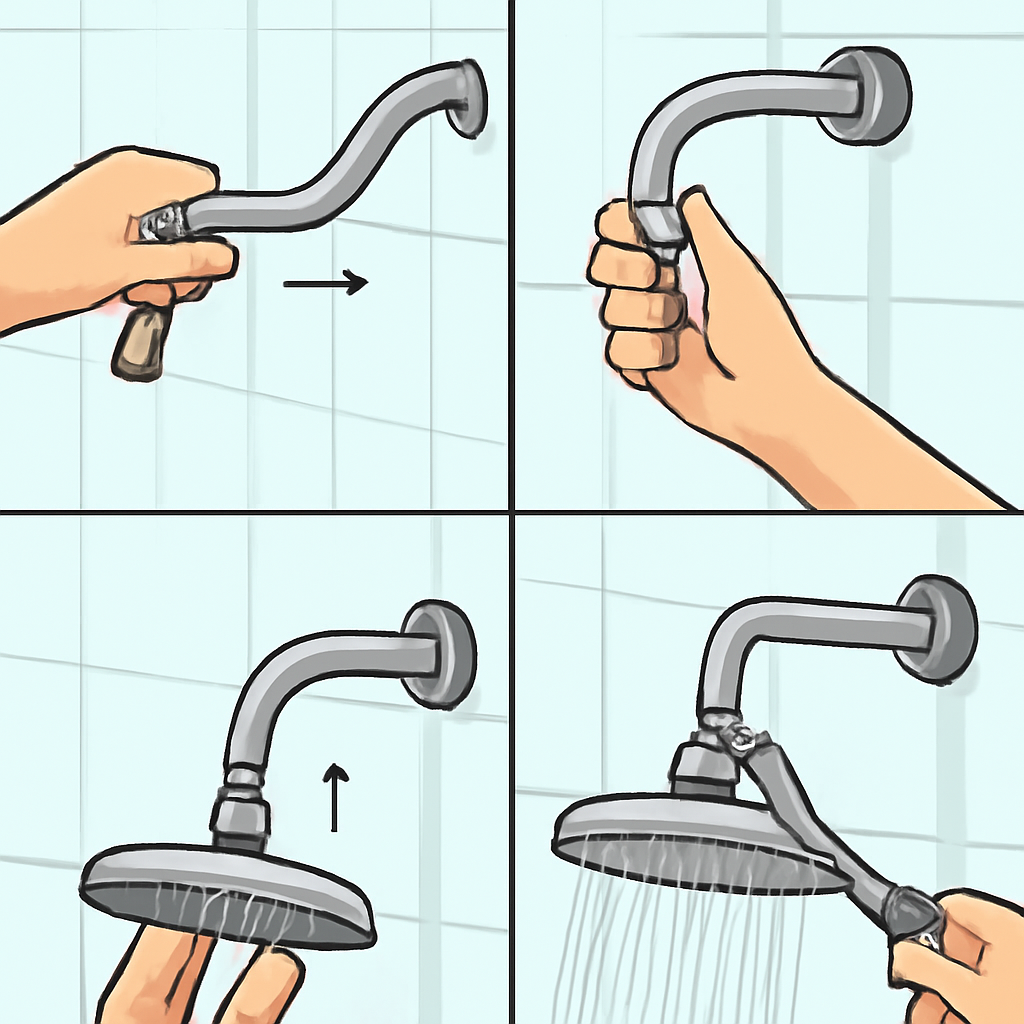
How to install a rainfall shower head
Following manufacturer installation steps is essential, and using proper shut-off valves on the line makes maintenance straightforward and leak-free. Ensure the water supply lines match the head’s fittings and test pressure before finishing the project.
Steps
- Shut off the water to the bathroom. Remove the existing shower head and inspect the arm and flange for corrosion.
- If needed, install a longer or reinforced shower arm and apply thread sealant tape to 1/2″ NPT threads.
- Install a local shut-off valve on the supply line before the valve body to enable quick maintenance without draining the entire system.
- Attach the rainfall shower head to the arm and align it for an even spray pattern. Use the mounting hardware provided and tighten with a wrench carefully to avoid stripping.
- Restore water and run the head at full force for a thorough pressure test. Check all joints with soapy solution for leaks and reseal as needed.
- Adjust the angle and height for comfortable coverage, then add a simple water-saving flow regulator if desired to control peak flow without sacrificing experience.
Pressure test tips
- Test at normal operating pressure (typically 40–60 psi). If a leak appears, tighten connections again and reapply sealant where needed.
- If the line pressure is inconsistent, verify the supply valve pressure and consider a regulator or booster in extreme cases.
Best shower head for low water pressure
Low pressure can dull rainfall-style experiences, but the right shower head can make a noticeable difference. Look for high-pressure performance or pressure-compensating features that maintain comfortable flow at lower psi. Pairing with a flow regulator helps you keep water use predictable without sacrificing comfort.
Selection criteria
- Pressure-boosting design (air-injection or other flow-enhancing tech).
- Pressure-compensating flow restrictors that maintain a steady 1.5–2.0 gpm across a range of pressures.
- Compatibility with existing plumbing and a hose or arm that supports the intended spray pattern.
Practical pairing
- Choose a rainfall head with a robust spray channel and optionally add a regulator at the head or valve. If water pressure is very low, consider a handheld option with high-pressure performance as a backup for certain showers.
Ideas for shower enclosure in small bathrooms
A compact enclosure should feel open while staying highly functional. Favor glass to maximize light and sightlines, and plan tile and storage to keep floor space clear.
Design principles
- Clear glass and frameless doors create a seamless, airy look that visually enlarges the room.
- Sliding or bi-fold doors conserve space and reduce door-swing clearance in tight bathrooms.
Tile layout and corner shelving
- Use large-format tiles to minimize grout lines and continue the tile from the bathroom into the shower for a cohesive feel.
- Plan corner niches or recessed shelving in the shower wall to store toiletries without protruding fixtures.
Glass door installation tips
- For small baths, install frameless doors with minimal hardware and proper sealing. Ensure precise alignment and use high-quality silicone seals to prevent leaks.
- Consider a walk in shower design with a matching tile option that runs uninterrupted to the shower threshold for a clean, expansive appearance.
Tile options and walk-in considerations
- Favor light tones and subtle patterns for walls and floors; options include large porcelain slabs, porcelain or ceramic subway layouts, and glass mosaic accents for a touch of texture.
- A walk in shower with a low curb and continuous tile creates a spacious feel and pairs well with glass shower door installation tips to keep lines clean and modern.
shower FAQ
This shower FAQ delivers practical guidance on ROI, budgeting for rain showers, and installing a rainfall shower head in a walk-in or shower stall.
What’s the best ROI metric for shower renovations?
The best ROI metric is cost-to-value and payback period. Track how upgrade costs translate into a higher sale price, not just aesthetics. In many markets, bathroom renovations recoup around 60% of costs when you include features buyers expect, such as a glass shower door and a reliable shower head set in neutral tile.
Tip: Use cost-to-value comparisons to guide scope.
This helps avoid over-investing in niche features and keeps upgrades buyer-focused.
Tip: Favor durable, visible features.
Glass shower doors and a dependable shower head often influence buyer decisions more than complex lighting or luxury niches.
Is a rain shower worth it for smaller budgets?
A rain shower can fit a modest budget if you keep the scope tight. A single rain head with a clean arm delivers a spa-like feel without a full system. In small baths, pair with a compact enclosure and clear glass to enlarge the room. If water pressure is limited, choose a higher-flow model or add a booster rather than multiple heads.
Tip: For low pressure, aim for about 1.8–2.0 GPM.
Tip: In a small bathroom, clear glass helps the space read larger.
How to install a rainfall shower head?
Turn off the water, remove the old head, and wrap threads with plumber’s tape. Install a compatible shower arm or ceiling mount, then reattach the rainfall head and test for leaks. If ceiling mounting, ensure proper support and slope for even spray.
Tip: Use thread sealant and test connections before finishing tiles.
Tip: For ceiling installs, confirm structural support and compatible supply lines.
ROI-focused takeaways
Shower design choices impact both occupant satisfaction and long-term costs. By pairing features like rain showers, walk in shower configurations, and glass shower doors with durable materials and water-saving fixtures, you can elevate appeal without compromising budget. A clear, ROI-driven approach helps contractors align upgrades with tenant needs and property price points, delivering measurable value at turnover.
Key takeaways for professional contractors
Align shower features with target price point and tenant needs to maximize ROI
Match shower configurations to the property segment: entry-level units benefit from reliable basics (shower stall with durable tile and a standard shower head), while mid- to high-tier units justify glass shower door upgrades, frameless aesthetics, and optional rain shower heads. Consider how far a design can push perceived quality without exceeding market rents. For rental properties, prioritize features tenants actually notice—easy-to-clean surfaces, a reliable water control valve, and a shower space that feels larger than its footprint. Use walk in shower concepts where space allows to reduce the sense of enclosure, and balance the premium feel of a glass enclosure with maintenance realities.
Prioritize durable materials and efficient fixtures to reduce lifecycle costs
Invest in porcelain or high-quality ceramic tile, epoxy grout, and tempered glass for longevity. Favor solid-surface surrounds or high-grade acrylics in shower enclosures to resist staining and mold growth. Pair these with efficient fixtures: low-flow shower heads (roughly 1.5–2.0 GPM) and thermostatic controls to minimize water waste and comfort complaints. Durable hardware—stainless or electroplated finishes—reduces replacement cycles in high-traffic rental spaces. These choices shrink maintenance calls and extend intervals between renovations, improving total cost of ownership.
Next steps to implement in client projects
Create an ROI checklist covering shower head, door, enclosure, and tile options
Develop a standardized checklist to compare options across price bands. Include shower head choices (rain shower head compatibility and low-flow options), door considerations (glass vs. framed; anti-lime coatings; hardware durability), enclosure formats (walk-in versus corner stalls; threshold relief), and tile selections (slip resistance, grout type, color fastness). Include installation complexity and expected maintenance needs to forecast lifecycle costs and resident satisfaction.
Prototype designs in various small bathroom layouts to optimize perceived space and flow
Create 3–4 small-bathroom design prototypes that test different layouts: a compact walk-in shower with a frameless glass door, a corner shower stall with patterned tile to enhance perceived size, and a rain-head setup in a 60–72 inch alcove. Use tile options and enclosure styles to maximize perceived space, then model flow with 3D renders or punch-list walkthroughs for clients. This approach clarifies tradeoffs between shower enclosure design, tile direction, and head options—helping clients choose configurations that feel larger while staying within budget.